In times of stress and when I need to regain a semblance of control over life, I find great comfort in organising. It’s probably my favourite activity all the time but it’s especially soothing when I’m feeling low, when my grief hits me hard enough to make brainwork impossible but leaves enough energy and motivation to do something with my hands.
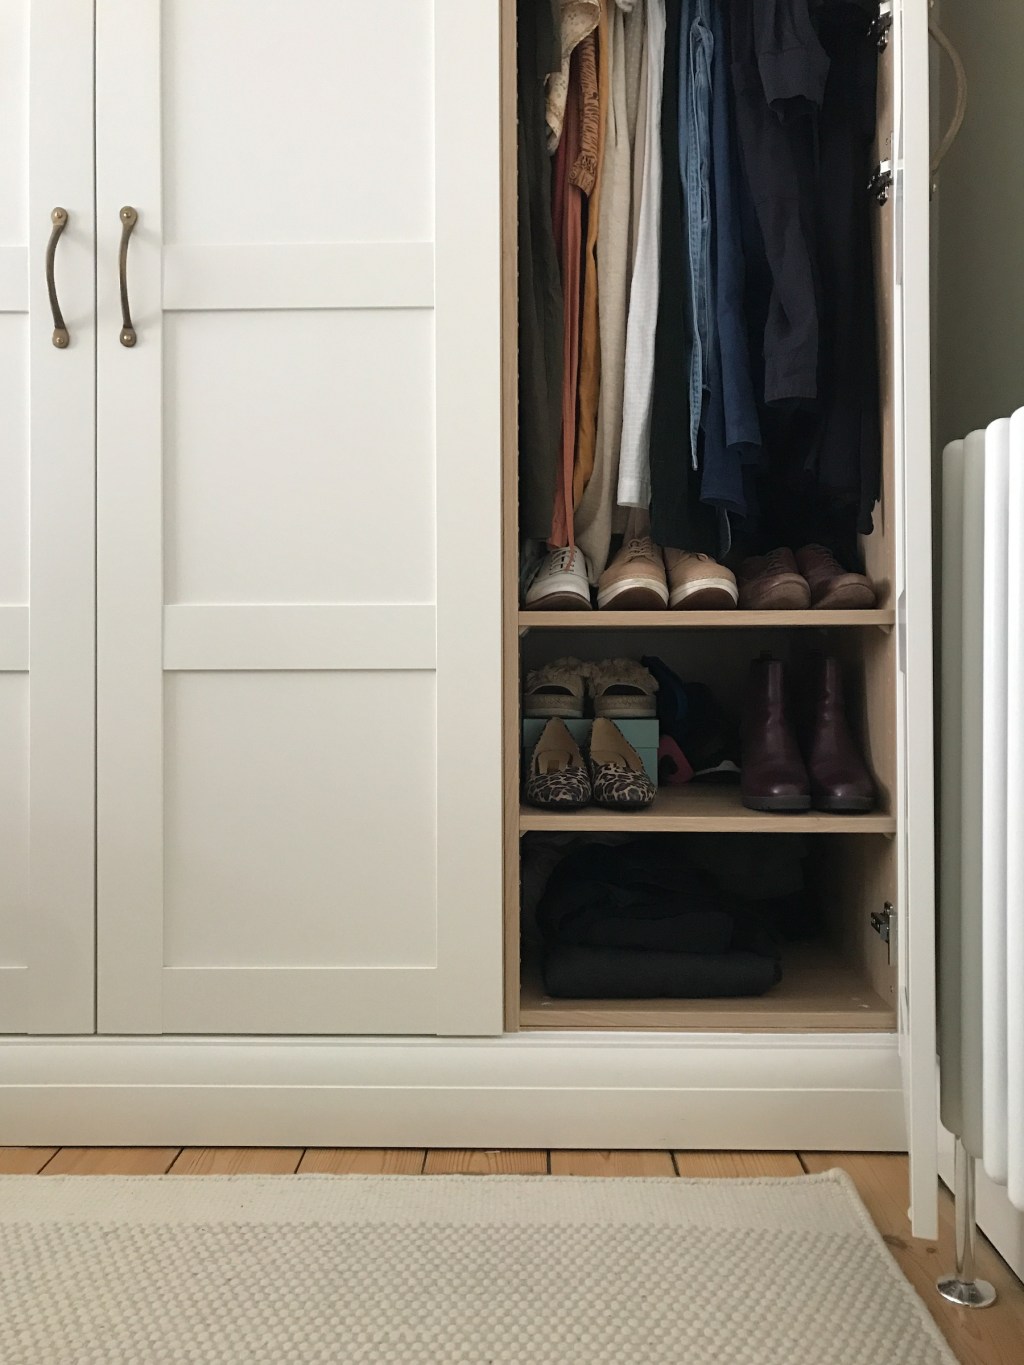
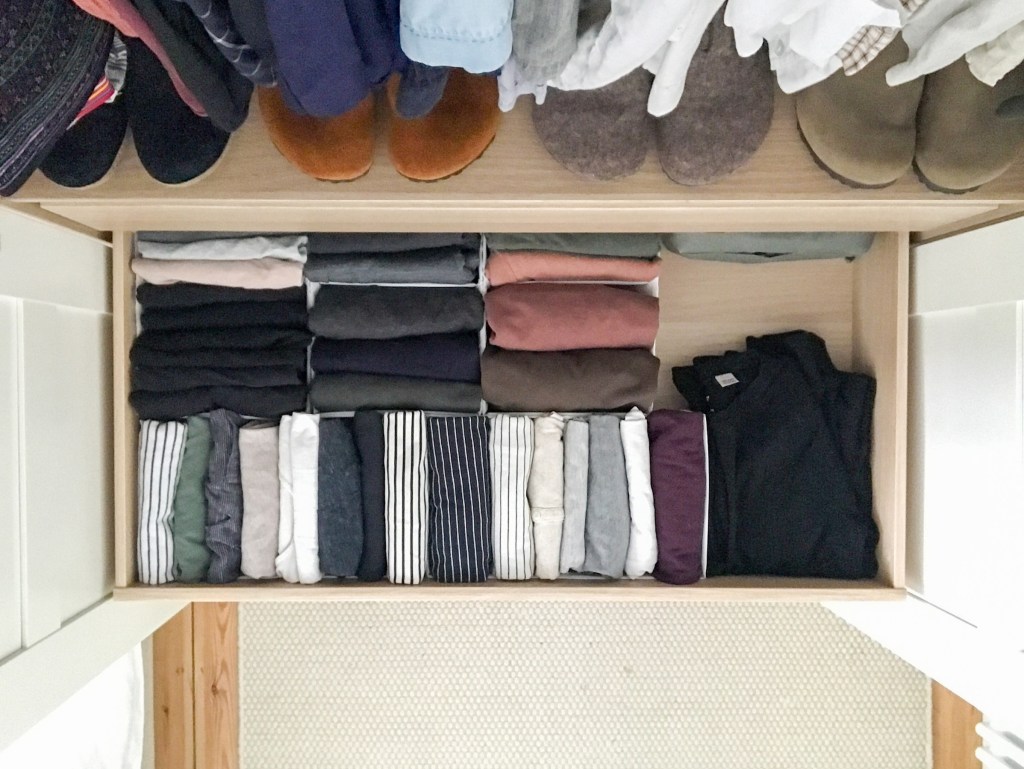
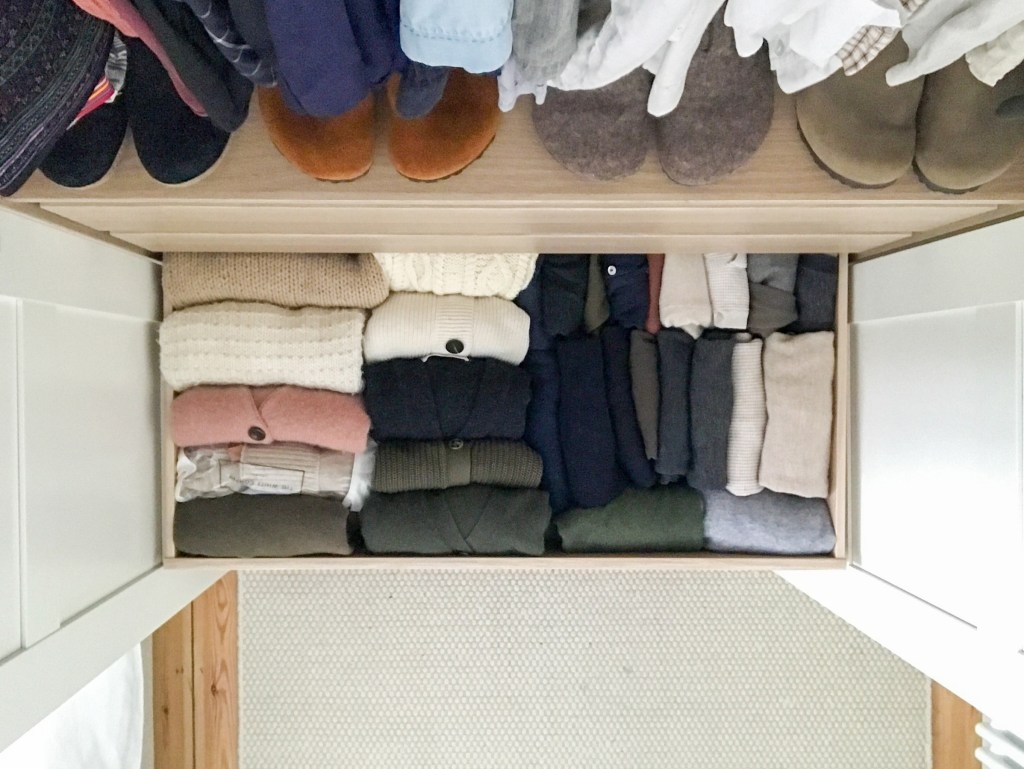
Once I made the difficult decision to pack away my maternity clothes (though maternity vests are a winner for life), every single drawer and box got the Marie Kondo treatment, and my clothes now hang by colour and then garment type, which I’m finding very soothing for my soul. I recognise that this definitely isn’t everyone’s idea of a good time, but for me it’s been transformational whilst I’m in a season of my life where it sometimes feels like I have no control over anything.


I’m still working out what has staying power for me in my ‘new life’ and have been selling and buying a lot on Vinted, which was perfect when I really felt that I needed a wardrobe refresh when frankly I couldn’t have a full life refresh, but didn’t want the financial and environmental impact of buying everything new. But I’ve realised I definitely have a consistent colour palette across my wardrobe which makes things easier.
For the first time I even decided to let go of some of the clothes I’ve sewn myself, perhaps as the last year showed me just how transient everything is, so does it make sense to keep hold of things that we no longer feel completely drawn to, even if they feel special because we made them? I think I would prefer them to ‘live’ and be enjoyed by somebody else, rather than languishing unworn in my wardrobe – especially considering the time and care that went into making them. For now at least my hand knitting is still safe in my drawers. (I share more about making from sewing and knitting to weaving, ceramics and other creative pursuits here).
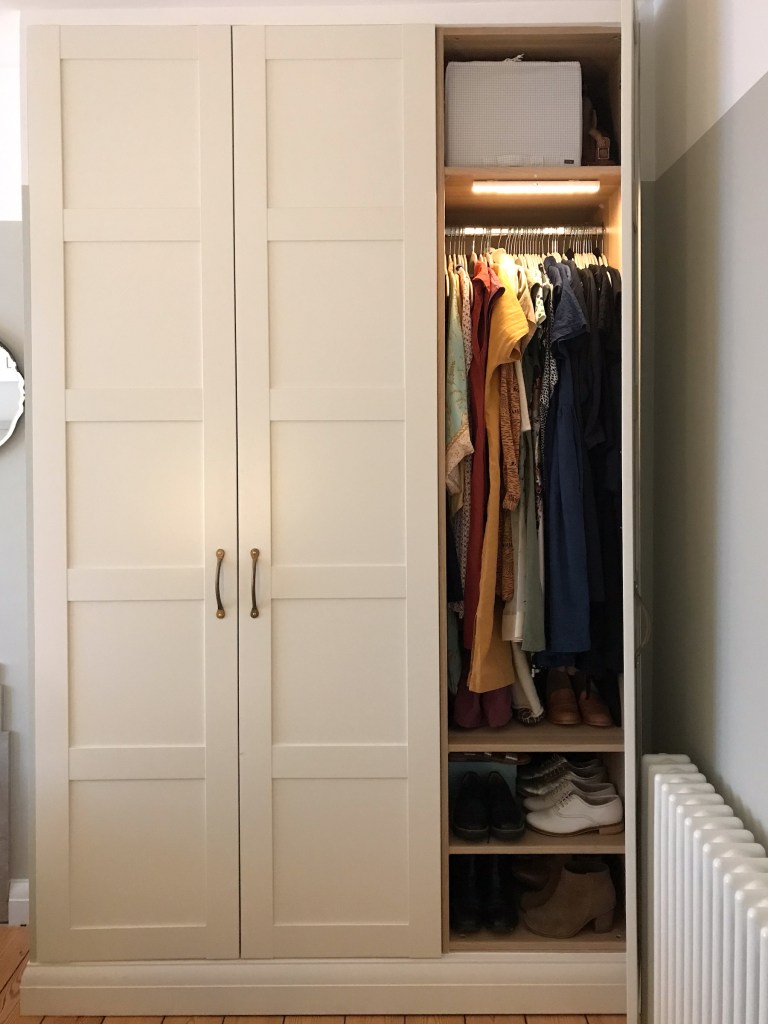
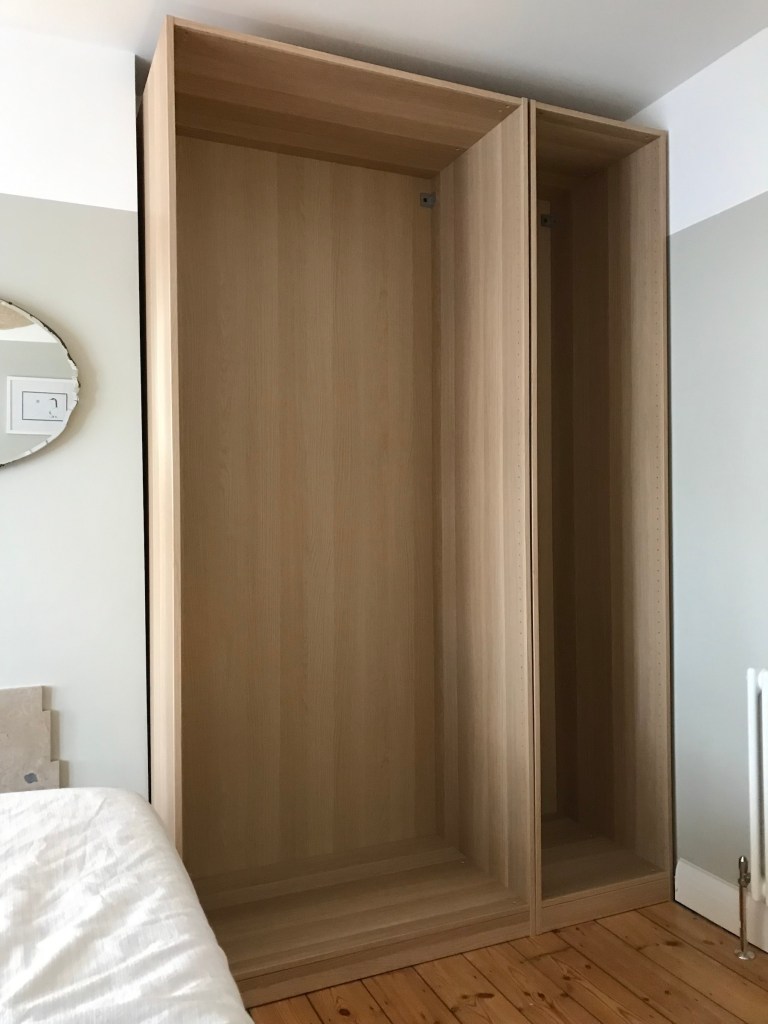
These wardrobes themselves also bring me a lot of satisfaction and pride every time I look at them, as I actually built them myself (with help from Adam of course) to replace the ‘temporary’ wardrobe that sagged there for six years, patiently waiting for an upgrade whilst we prioritised everything else during our live-in renovation.

You can find a tutorial to create your own built in wardrobes a bit further down this post.
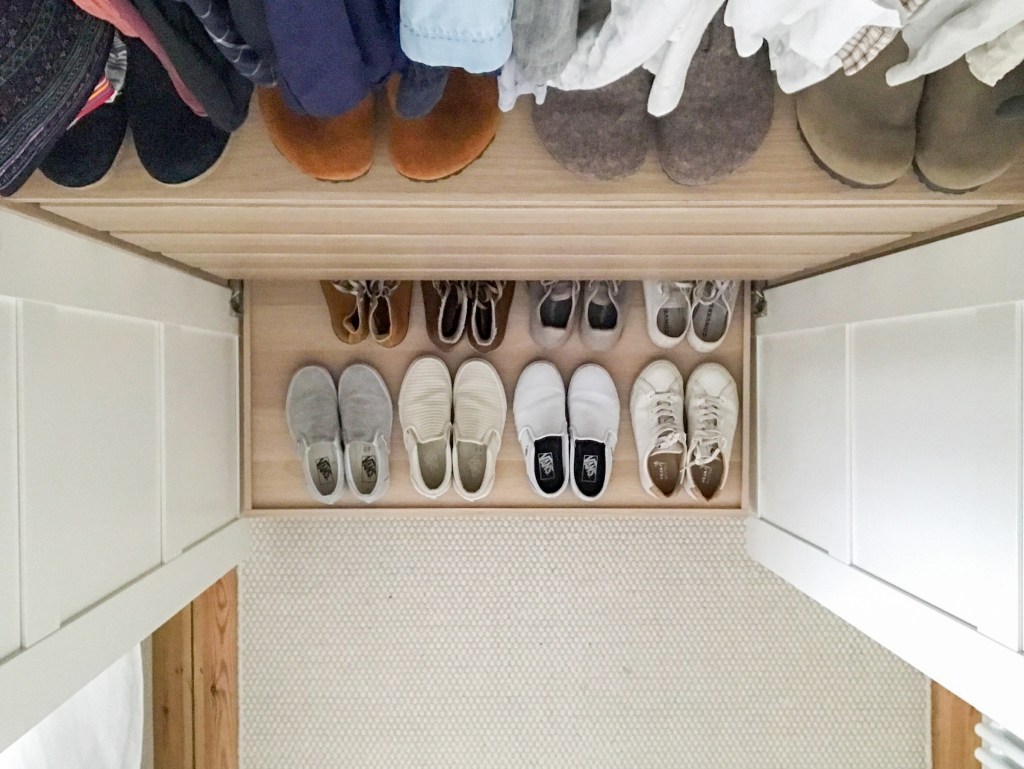
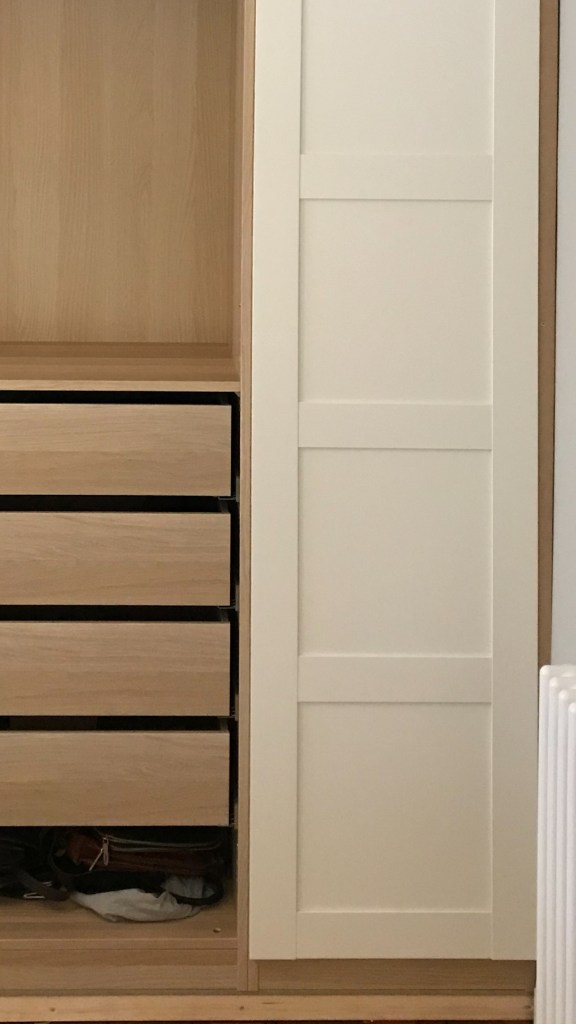
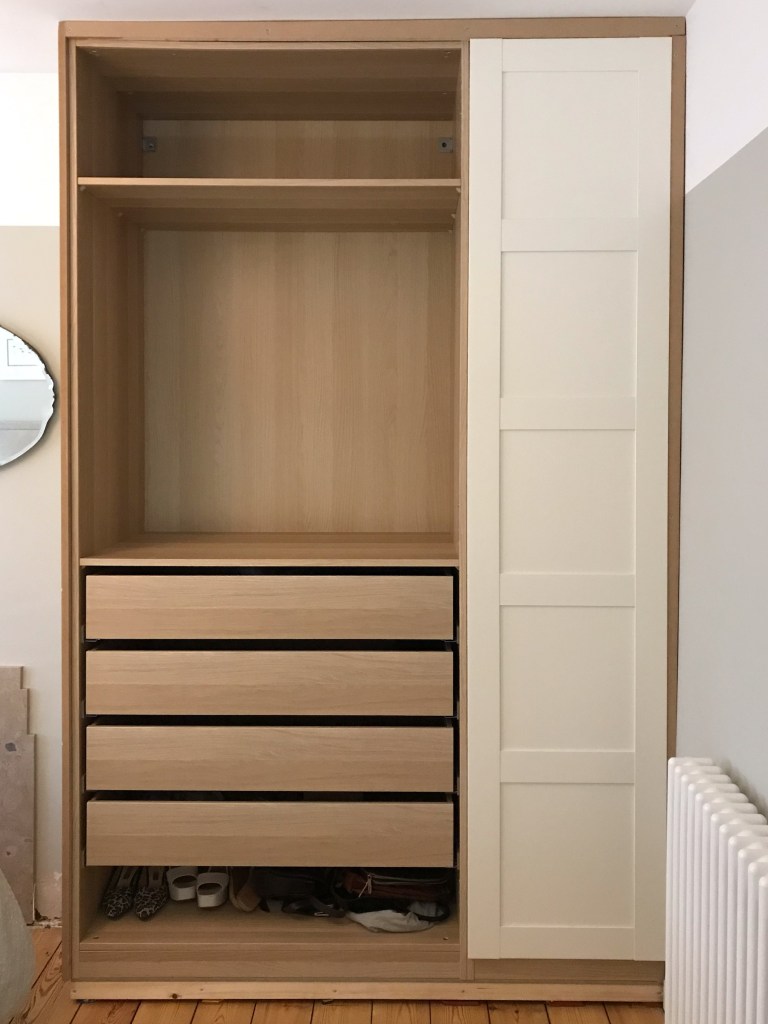
They’re an IKEA PAX hack designed to emulate built in wardrobes I was quoted over £5,000 for. All in I think these cost about £700, maybe £750. I remember I was in the IKEA basement picking these out when I got the message to say my nephew had been born (precisely 363 days before my own beautiful son Stewie). A great day on two fronts. But you really can’t overestimate the joy of an organised drawer when you’ve spent six years getting socks out of open boxes a foot above eye level.
This is how this alcove looked when we bought our house in 2015. Happily, this room all got ripped out and replastered before we moved in. The combination of burgundy carpet with blue wallpapered wardrobe doors was quite inexplicable, but nothing compared to the pink and blue woodwork that ran throughout the rest of the house. (You can see all of the before photos in their technicolour glory here.)

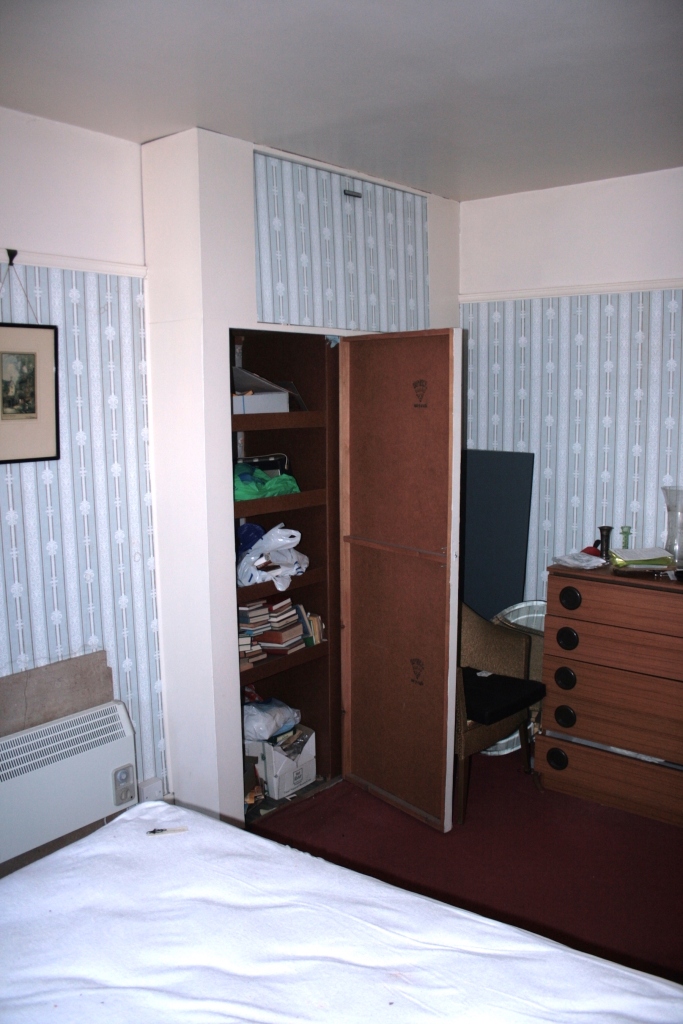
Things got a bit better with a ‘temporary’ rickety canvas wardrobe, featuring the pink boxes that were the impractical home of my socks for so many years – not ideal bearing in mind I’m only 5ft1. I’m not sure anybody expected this wardrobe be around for so long, and I can’t say I miss it, though I’m happy (and surprised) to report that it went to a new home via FB marketplace.

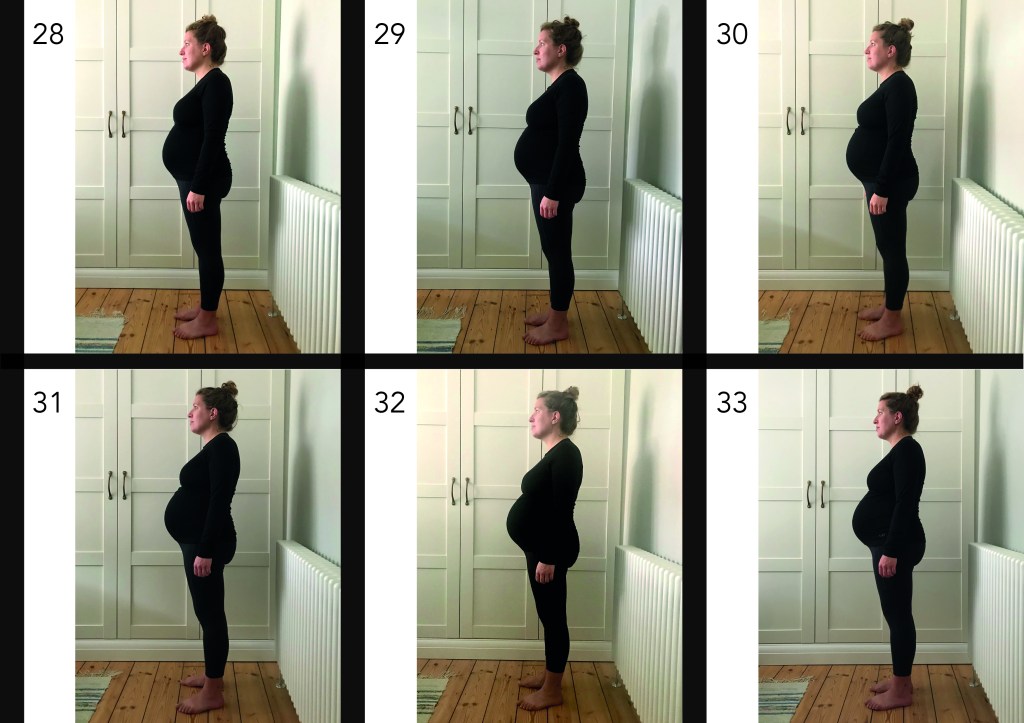
But beyond the benefits of improving the simple process of getting dressed in the morning, I also have wonderful memories of standing in front of my lovely new wardrobes every week for Stewie bump photos, from week 14 to 38 of my pregnancy which we started straight after we returned from our Big Adventure. Only week 22 was taken on our babymoon in Italy (a pasta odyssey in Venice and Florence which lived up to all my pasta craving hopes and dreams), and week 39 was taken with Adam in the hospital the day I was induced to bring Stewie peacefully into the world, right before we moved from the bereavement suite to our delivery room. I remember Adam would have to crouch in the most ridiculous stress positions to try to get the alignment moderately similar from week to week. He was definitely not my biggest fan in those moments. But I’ll always treasure these photos, and the memories of just how much fun I had winding Adam up.
IKEA PAX HACK – DIY Built in Wardrobe Tutorial

In case anybody wants to try this IKEA hack themselves, below is a rough guide of what I (we – no matter how much I promise to do projects myself, Adam always gets dragged in) did. Note that you may need to fine tune some details, so make sure you have a plan and a shopping list before you start. The photos hopefully make sense but as I never anticipated creating a tutorial, they may jump about a little bit.
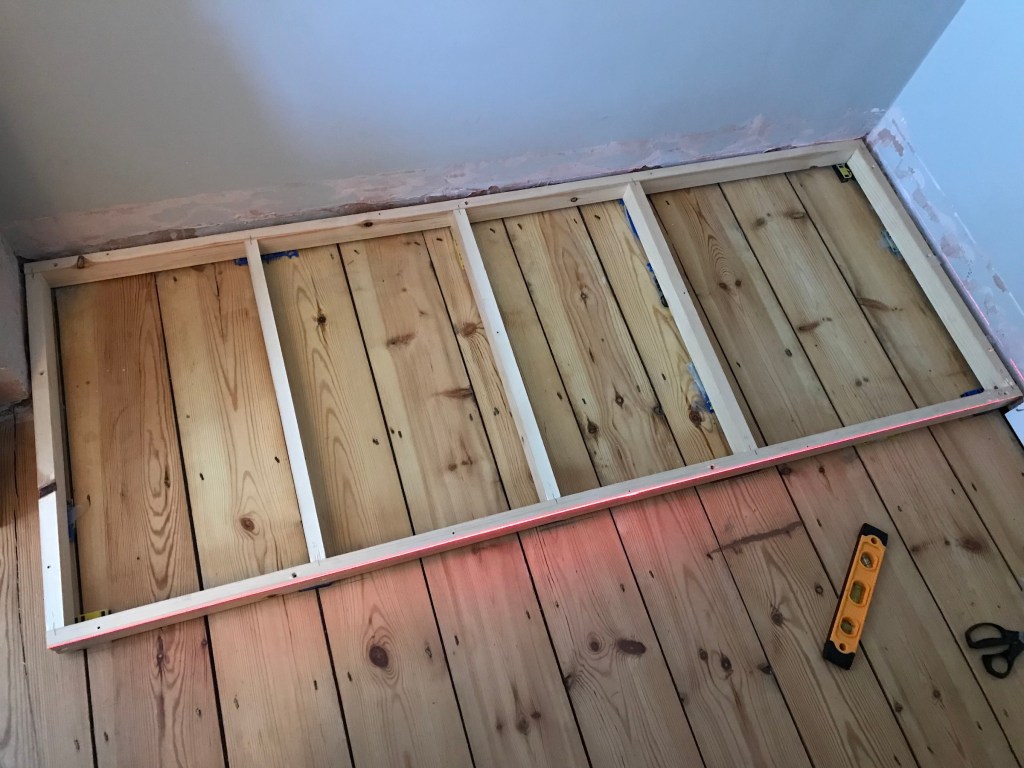
- First the IKEA PAX wardrobe carcasses (a 1m double and 50cm single in the tallest size) were built so that I could work out exactly what the wardrobe footprint would be. I then cut away existing skirting board from the alcove so that the wardrobes could fit snugly in there.
- I then moved the wardrobes back out of the alcove so I could build a platform for them to sit on top of, in order to raise the wardrobe high enough to fit skirting board beneath the doors with a 3mm or so gap between the skirting and bottom edge of the doors. (Note: the height of your platform will be dictated by your skirting board height, so you’ll need to do the maths to work this out). The platform was built from 2x4s and a plywood sheet, and was the same footprint as the wardrobes. Adam immediately rebuilt the platform as I have a ‘flexible’ approach to using a spirit level. Don’t be me. Be patient and make sure it’s right. I do recommend this step though if you have the fortitude and ceiling height, as skirting board really helps make the wardrobes look built in.

- The wardrobe carcasses were put on top of the platform and secured to each other, the platform, and the wall. We couldn’t actually get all of the IKEA supplied brackets screwed in as our 1930s walls are wonkier than they look, meaning there are gaps of varying sizes between the wardrobes and walls, but almost two years on they still seem to be safely secured. On the advice of Adam (civil engineer but also just a sensible person) we made sure the wardrobe carcasses were leaning ever so slightly back, I think to help with the weight of the doors wanting to pull everything forwards.
- I then attached a full height MDF sheet to the left side of the wardrobes to create a sort of ‘faux wall’ with a seamless join between the wardrobes and chimney breast, making it protrude out from the wardrobe carcass by the same depth as the IKEA BERGSBO doors. This was done so that the doors would look like they were inset to a ‘wall’.
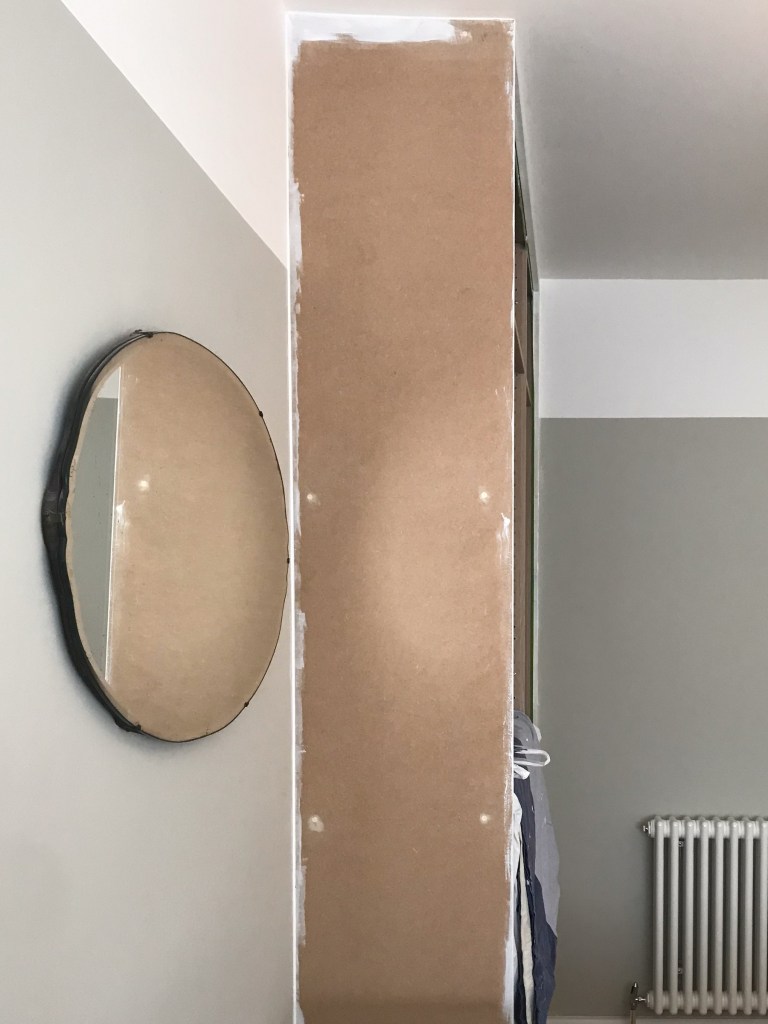
- I installed scribed MDF strips along the top and right hand side to fill the uneven gaps, attached to batons screwed to the wardrobes from the inside. These MDF strips were also made to protrude out from the wardrobe carcasses the same depth as the door thickness. (Note: I bought the tallest IKEA wardrobes and we don’t have any cornice in our house, so I just used plain MDF strips along the top, but you can also put cornice at the top if you have the ceiling height to allow for this – you may need to get the shorter wardrobes for this though).


- Finally I attached an MDF strip along the base to secure the skirting board to.
- All of the wood trim and fillers were caulked to neaten the joins, and primed and painted to match the walls. Side note: several years ago after we replastered, I painted the walls up to picture rail height with the intention of reinstalling the rails, then decided I liked the way it looked without. Good thing I painted the lines so neatly, though back then we couldn’t afford a laser level so it was all done with a spirit level and frog tape. So it’s also a bit of a miracle.

- Newly cut skirting boards were then attached the whole way round to complete the built in aesthetic. We couldn’t reuse the skirting boards that were there before as we now needed to cut different angles to wrap around the wardrobe (meaning the boards needed to be a little bit longer than before). Luckily we had spare in the loft from when we replaced them throughout the house with new MDF skirting in the original style, but minus the wood rot.
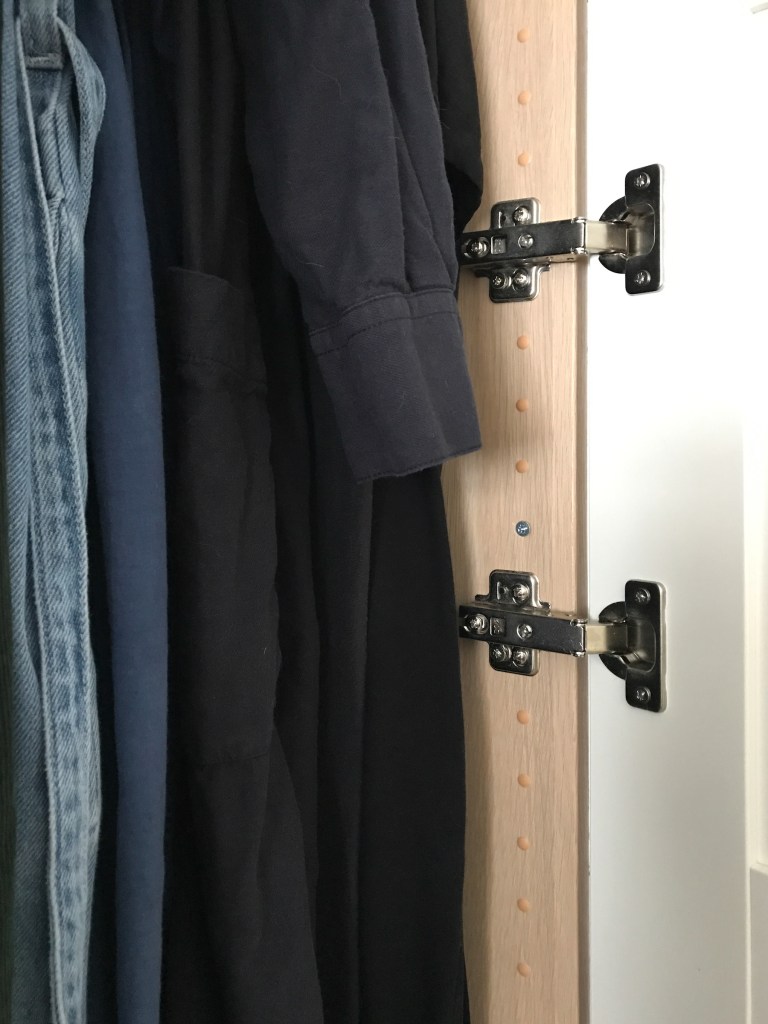
- Adam hung the doors at various points to check everything worked (so I’ve just put this near the end), and aligning them was a nightmare I can’t and won’t speak of. Be warned – if you want inset doors, it’s not easy to line everything up as they can end up hitting the wood surround which is what kept happening here. If you want an easy life, the wood fillers around the outside of the wardrobes could just line up with the wardrobe carcasses, so the doors sit in front of the frame, rather than inside it.
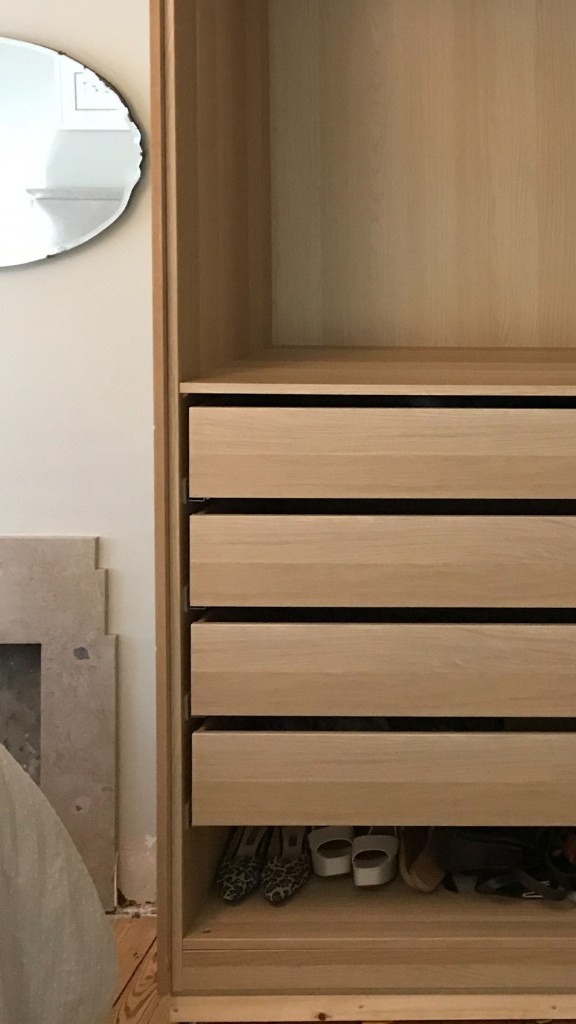
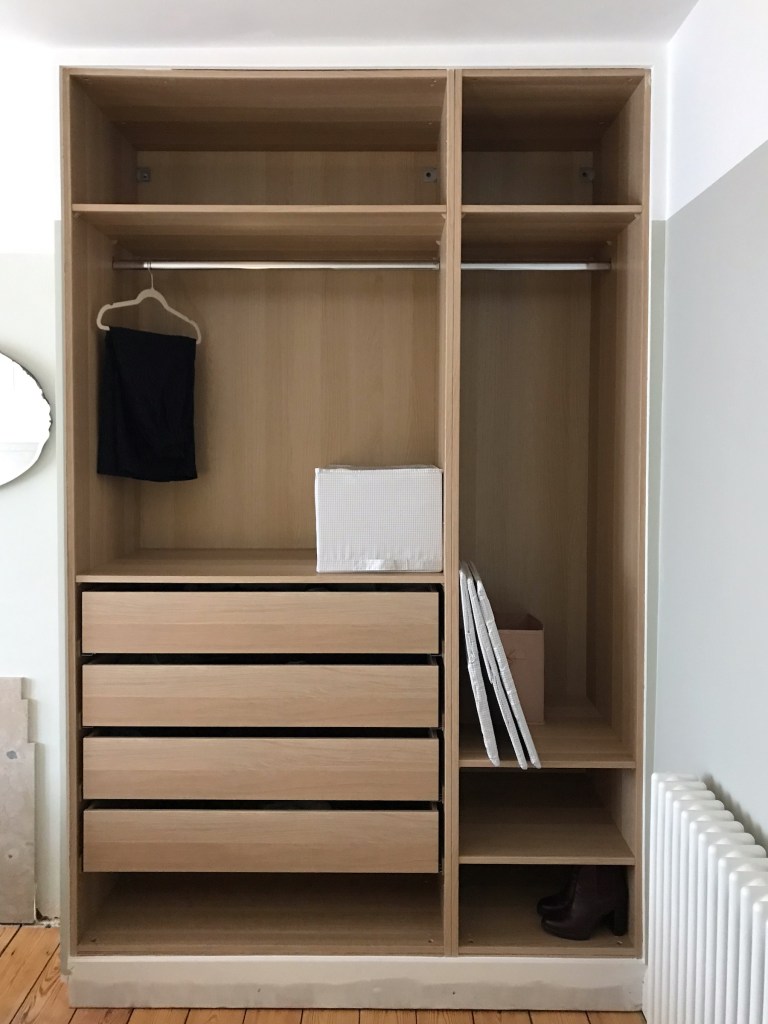
- I then added some non-IKEA finishing touches – I filled the holes inside with beige plugs which I think I found on eBay, installed a chrome rail from Amazon as I historically don’t like the IKEA ones (though I really don’t like giving JB more money either), and added brass handles to the doors – there are lots of good brass handle options out there at varying prices.

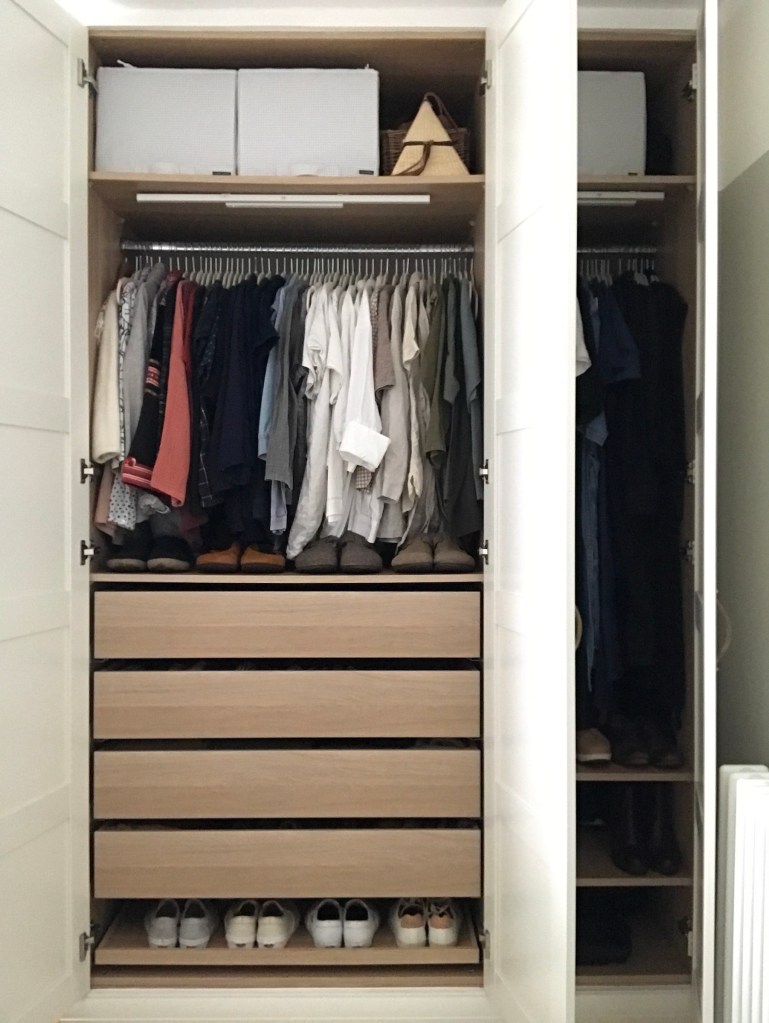
- Finally, we added IKEA motion sensor wardrobe lights inside that run on rechargeable batteries. They’re good but the batteries do go down fairly quickly, and unevenly – I hardly open the single wardrobe so that light still works almost two years on, but the double wardrobe has been needing recharging for months. (This photo is from when the wardrobes were first built, and includes many shoes that sadly had to be sold as my feet really changed shape during my pregnancy, and after a pandemic spent in Birkenstocks).
That was pretty much the crux of it. There are definitely more technically astute, and less emotional guides out there to do this (and I would advise consulting Google or an actual expert for any technical questions), but suffice to say organised wardrobes that are fit for purpose truly can bring a little bit of peace, joy and satisfaction to the most mundane parts of life, even at the hardest of times.

Leave a comment